
DIY Charging Station
This is something I have seen all over Pinterest and Reddit. The only problem was that there was no tutorial for it….Challenge accepted!!!
So here is what you will need…

The supplies
- bread bin
- multi plug that will fit inside the bread box
- drill with various sized drill bits
- cutting knife
- canvas board
- masking tape
- measuring tape
- pencil
- set square
- cupboard clips
- super glue

My best friend;)
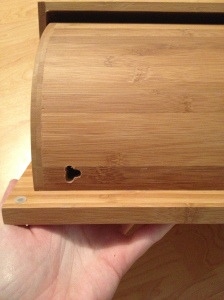
First step is to drill a hole in the back of your read bin as this is where the cord for the multi plug will run through. My bread bin was made out of bamboo, which meant that when drilling the hole I had to start with a small drill bit and gradually go bigger. I also taped masking take on the back and front of where I was drilling to avoid splintering.

Then I got the man of the house to take the plug off of the multi plug so that I could feed the cord through the hole. He then re-attached the plug.

multi plug in place
I chose to use cupboard clips to keep the cover attached. I did not want to glue it closed. I measured and marked off where I wanted to placed the clips, and then drilled small holes on the inside of the bread bin for the screws.

Clips in place
Next, the cover. I used a canvas board, but any rigid hardboard or thin wood would do- provided you have means to cut it. The canvas board was tough to cut- I wont lie. The trick was to cut through the board from the back and peel away the layers of cardboard underneath until you reach the canvas. I measured out the width and height of the cover, and then measured out the small slots for the cables. My multi plug only had space for 4 two-prong plugs, so I only cut 4 holes.

Cover with clips glued on
Lastly I measured up the clips on the inside of the bread bin and marked off the placement of the other part of the clip on the back of my cover. Then I glued into place.
Let it dry….ok so when it is dry, test it out!

testing the cover and the clips…just right:)
Ta-Daa! Done! Now all that is left to do is plug in all of your chargers into the multi plug, roll up the excess cabling and tape in place, and then feed the charger head through the slots in the cover. The great thing about this unit is that it hides all of the cables away out of site, and leaves just the charging adapters peaking out. For my boyfriend and I it is perfect seeing that we have just so many gadgets to charge!!!

Just a normal bread bin?
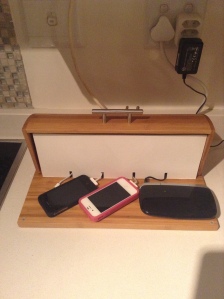
all the gadgets charging in harmony:)
When not in use, it looks like any other bread bin and blends in well with the rest of the Kitchen decor:)
Happy Crafting!


